

How do you adjust the colors on your screen in Windows 10?
Adjust colors in Windows 10

Did you buy a nice new monitor, but are the colors disappointing? This is probably due to your settings. You can adjust the color settings with the 8 steps below. These are all tips that may help, so you might not have to go through all 8 of them.
- Adjust the colors via your monitor.
- Adjust the brightness in Windows.
- Set up Windows HD Color.
- Set the correct color depth.
- Update your driver.
- Open color management.
- Set a new color space.
- Calibrate your monitor.
Tip 1: adjust the colors via your monitor
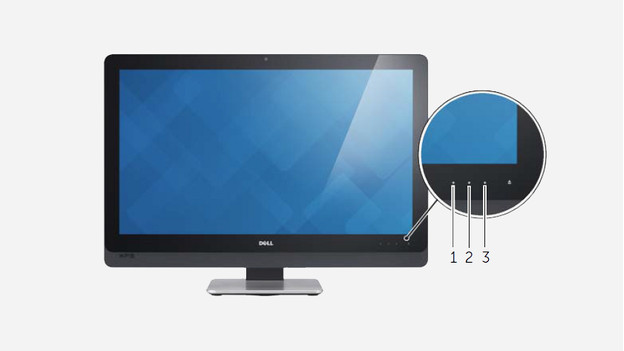
Every monitor has a built-in menu or on-screen display (OSD). Press a physical button on the front or back of your monitor to open this menu. Though each monitor has a different menu, you'll often find the brightness, contrast, and color temperature here. A high brightness, high contrast, and warm color temperature ensure vibrant colors. Experiment a bit with this to find your ideal color settings. You can adjust the rest via Windows.
Tip 2: adjust the brightness in Windows
A higher brightness ensures that you can see your screen well in lit rooms, but it also ensures bright colors. Is your screen overexposed or dull? Set the brightness a little lower.
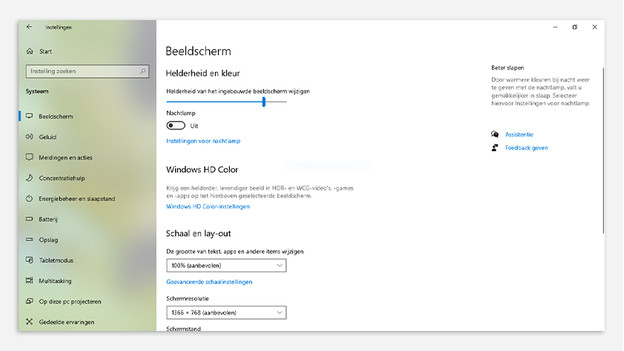
- Go to settings via the Windows menu on the bottom left of your screen by clicking on the gearwheel icon. Alternative: with some versions of Windows 10, the brightness is at the bottom right of the screen with your notifications.
- Now, go to System and then go to Display.
- Slide the bar left or right to adjust the brightness.
- Check HDR videos, HDR games, and/or WCG apps.
Tip 3: set Windows HD Color
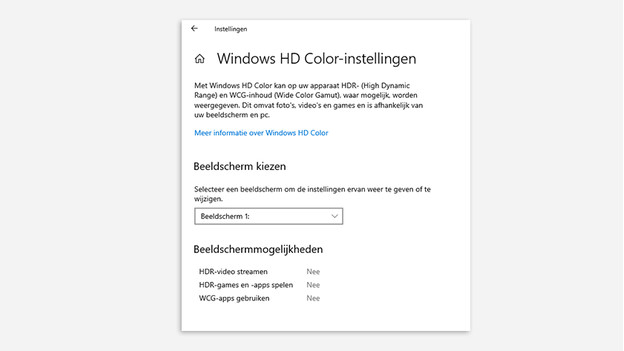
Do you have an HDR monitor? You probably want to watch movies and play games in HDR mode. First, make sure that HDR is switched on via the OSD of your monitor.
- Go to settings by clicking on the gearwheel icon.
- Go to System and then go to Display.
- Click Windows HD Color settings in blue when it appears.
- Check HDR videos, HDR games and/or WCG apps.
Tip 4: set the correct color depth
The more color depth bits your monitor has, the more colors it'll display. It's important that you set this up first.
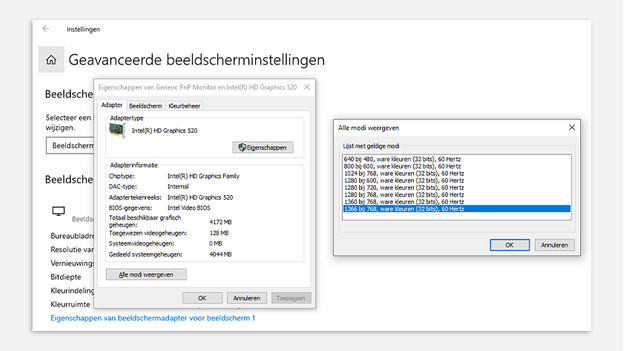
- To do this, go to Settings -> System -> Display.
- Select Advanced display settings at the bottom.
- Click the blue link starting with Display Adapter.
- In the Adapter tab, press List all modes.
- Select the mode with the highest number of bits, which is probably 32-bit.
- Click OK to save the adjustments.
Tip 5: update your driver
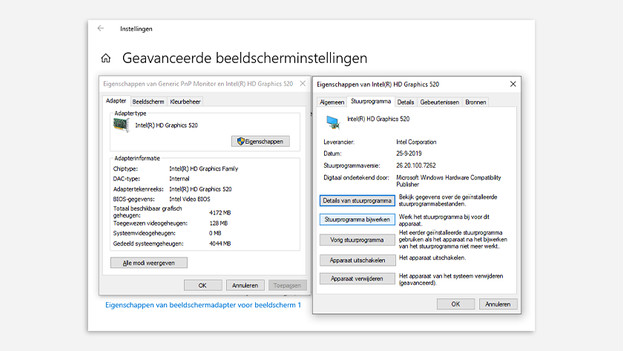
Install the most recent video card driver for the best communication between your PC and monitor. This makes your PC more stable and prevents bugs with the brightness and color representation of your monitor. You can easily do this by updating it.
- Go to Advanced display settings again.
- Click the blue link starting with Display Adapter.
- Select Properties under Adapter type.
- Go to the second tab titled Driver.
- Here, you can see the version of your driver. With Update driver, you can install the latest version.
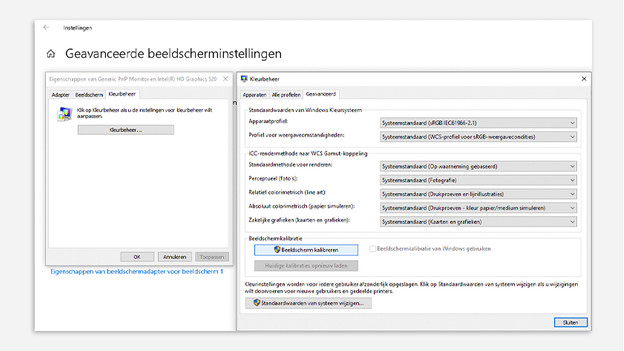
Tip 6: open color management

You can install or select new color spaces, default values, and rendering methods in color management. Note: only make changes here if you know what you're doing.
- To do this, go to Settings -> System -> Display.
- Select Advanced display settings at the bottom.
- Select the correct monitor and click Display adapter properties for Display.
- Go to the Color management tab and click the button with the same title.
- Keep this window open.
Tip 7: set a different color space

Are you a graphic designer or do you print professional prints? If so, a correct color space is important. Do you want a color space that isn't on your computer? Download it on the support page of the manufacturer of the monitor and go through the following steps:
- In Color Management, go to the tab Devices.
- Check Use my settings for this device.
- Click Add at the bottom and select Browse.
- Choose the downloaded profile you want to install.
- Go to the Advanced tab to check and select your installed color space.
Tip 8: calibrating your monitor
A final option is to calibrate your monitor. This adjusts the gamma, brightness, colors, and contrast of the monitor to a fixed standard. You can do this as follows:
- Make sure the screen is turned on for at least 30 minutes.
- Open Color management -> See step 6.
- Go to the Advanced tab.
- Select Calibrate Display.
- Select the monitor you want to calibrate and go through the steps.
- Not satisfied? Adjust some things on your monitor.
- Go through it again until you're satisfied.